.jpg)
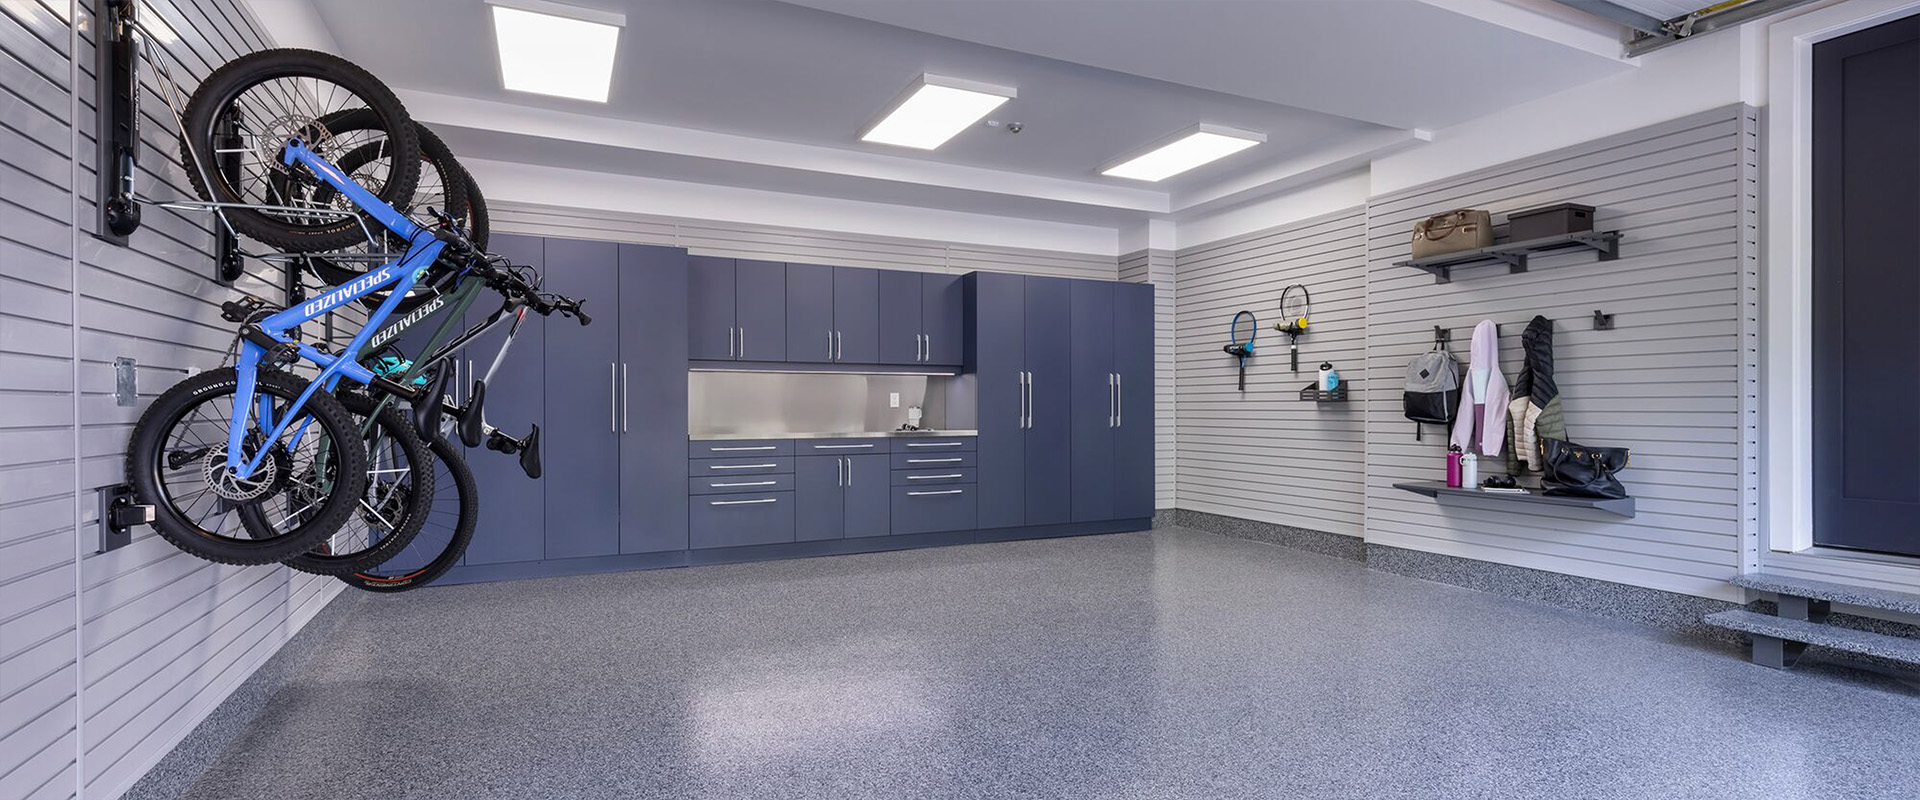
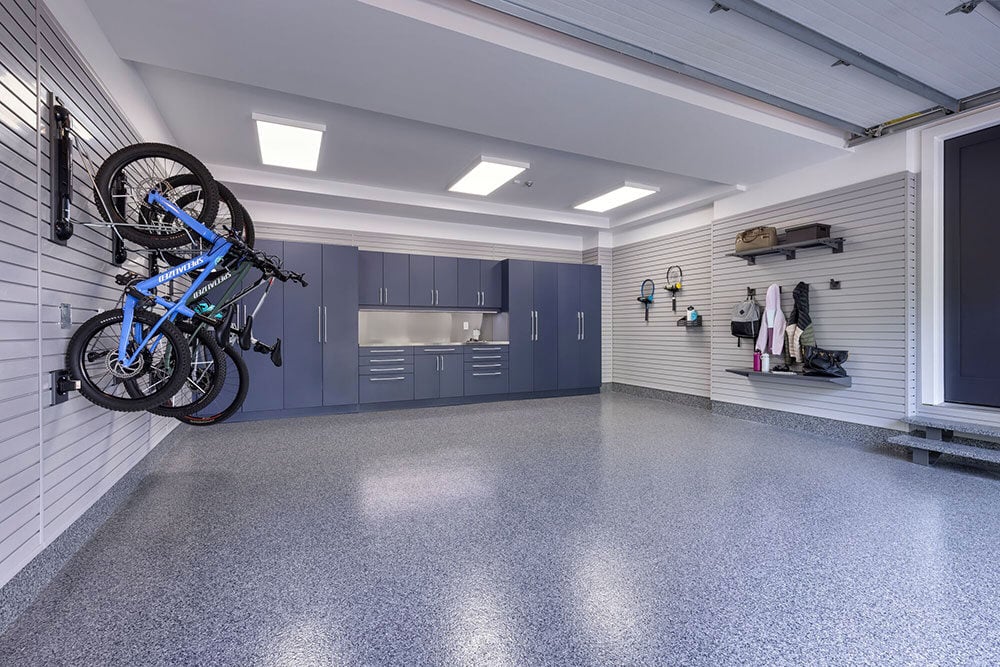
Planning a garage makeover means thinking beyond aesthetics. Your floor coating needs to support heavy-duty cabinets, wall-mounted slatwall systems, and ceiling-mounted overhead racks—all while handling daily vehicle traffic, chemical exposure, and temperature swings. Garage Living offers a complete system approach that pairs Floortex® polyaspartic coatings with integrated storage solutions engineered to work together.
This guide covers everything you need to know about selecting, preparing, and installing garage floor coatings that hold up under serious storage loads. You'll learn about coating chemistry, surface preparation, integration with cabinetry and wall systems, and long-term maintenance. By the end, you'll understand how to plan a garage renovation where your floor and storage components function as one cohesive system.
Key takeaways: garage floor coatings for heavy storage U.S. 2026
- Polyaspartic coatings outperform epoxy in flexibility, UV stability, and cure time—making them ideal for garages with heavy storage loads.
- Proper surface preparation accounts for 90% of coating longevity; diamond grinding creates a mechanical bond that adhesive primers cannot match.
- Garage Living's Floortex® system bonds deep into concrete pores and resists hot tire pickup, chemical spills, and abrasion from heavy equipment.
- Floor coatings must be fully cured before anchoring cabinets or slatwall—typically four to seven days for vehicle traffic and heavy loads.
- Integrated design ensures your flooring, cabinetry, and wall storage work together without compromising durability or creating stress points.
What makes a garage floor coating "heavy-duty"?
A heavy-duty garage floor coating resists abrasion, chemical exposure, impact, and thermal stress while maintaining adhesion under constant load. Standard floor paints and thin epoxy kits fail these criteria within months. The difference lies in coating chemistry and application thickness.
Polyaspartic and high-performance epoxy systems create a chemical bond with prepared concrete that penetrates into the substrate's pores. This bond must withstand point loads from cabinet legs, anchored slatwall brackets, and overhead rack hardware without cracking or delaminating.
Coating thickness matters too. Professional-grade systems typically apply at 15-20 mils total thickness across multiple layers. DIY kits often apply at 3-5 mils, which cannot absorb impact or resist abrasion over time.
Polyaspartic vs. epoxy: which coating supports heavy storage better?
Polyaspartic coatings outperform traditional epoxy in nearly every metric relevant to garages with heavy storage systems. Understanding these differences helps you make an informed decision.
Flexibility and thermal movement
Concrete expands and contracts with temperature changes. Your garage slab can shift several millimeters between summer and winter. Epoxy is rigid and tends to crack when the substrate moves underneath it.
Polyaspartic coatings maintain flexibility after curing. They move with the concrete rather than fighting against it. This flexibility prevents stress fractures around anchor points for cabinets and wall-mounted storage systems.
UV stability and color retention
Epoxy yellows when exposed to sunlight. If your garage door stays open regularly or you have windows, an epoxy floor will amber and become chalky over time. This degradation weakens the coating's surface integrity.
Aliphatic polyaspartic coatings are inherently UV stable. They maintain their color and gloss for years without fading or yellowing, even with daily sun exposure.
Cure time and project timeline
Epoxy requires five to seven days before you can drive on it. During this period, you cannot install cabinets, anchor slatwall, or complete other garage work. This delays your entire renovation project.
Polyaspartic coatings cure rapidly. You can walk on them within 12-24 hours and return vehicles within 24-48 hours. Full cure for heavy loads takes four to seven days—still faster than epoxy's timeline.
Chemical and abrasion resistance
Garages face exposure to motor oil, brake fluid, gasoline, road salt, and household chemicals. Both coating types resist these substances, but polyaspartic systems typically offer higher abrasion resistance.
Garage Living's Floortex® polyaspartic floor coating bonds deep into concrete pores and resists hot tire pickup—a common failure point for epoxy where heated tires pull the coating off the concrete when cooling.

How to prepare your concrete floor for a heavy-duty coating
Surface preparation determines whether your coating lasts two years or twenty. Skipping steps or using inferior methods guarantees premature failure, especially under heavy storage loads.
Why diamond grinding matters
Diamond grinding uses industrial equipment to remove the top layer of concrete, exposing fresh substrate and creating a rough profile. This profile gives the coating millions of tiny anchor points for mechanical adhesion.
Acid etching—the method included with most DIY kits—only removes surface contaminants. It does not create an adequate profile for professional coatings and often leaves residue that prevents proper bonding.
Crack and chip repair procedures
Hairline cracks and settling joints are normal in concrete slabs. These must be opened with a diamond cutting wheel and filled with polyurea filler or cementitious mortar before coating application.
Unfilled cracks telegraph through the coating over time. They also create weak points where moisture can infiltrate and cause delamination, especially around areas where you plan to anchor heavy storage systems.
Moisture testing and vapor barriers
Concrete absorbs moisture from the ground below. If your slab lacks a proper vapor barrier or sits in a high water table area, moisture can migrate upward and push the coating off from below.
Professional installers perform moisture testing before coating application. If levels exceed acceptable thresholds, they may recommend a moisture mitigation primer or advise against certain coating types.
Understanding coating layers and thickness for storage support
Professional floor coating systems consist of multiple layers, each serving a specific function. Understanding this structure helps you evaluate quality and make informed decisions.
Base coat functions
The base coat penetrates into the prepared concrete profile and creates the primary chemical bond. This layer must cure properly before additional coats are applied. It also establishes the color foundation for the finished floor.
Decorative flake broadcast
Most garage floor systems include decorative flakes or chips broadcast onto the wet base coat. These flakes add texture, hide minor imperfections, and create visual depth. They also contribute to slip resistance.
Flake size and density affect both appearance and function. Full broadcast systems (where flakes cover the entire surface) create a more textured finish that hides dirt and tire marks better than partial broadcasts.
Top coat protection
The top coat seals the flakes and creates the final wear surface. This layer takes the brunt of daily abuse from tires, foot traffic, dropped tools, and chemical spills. Its thickness and hardness determine long-term durability.
Polyaspartic top coats offer higher gloss retention and UV stability compared to epoxy clear coats. They also cure faster, reducing the total project timeline.
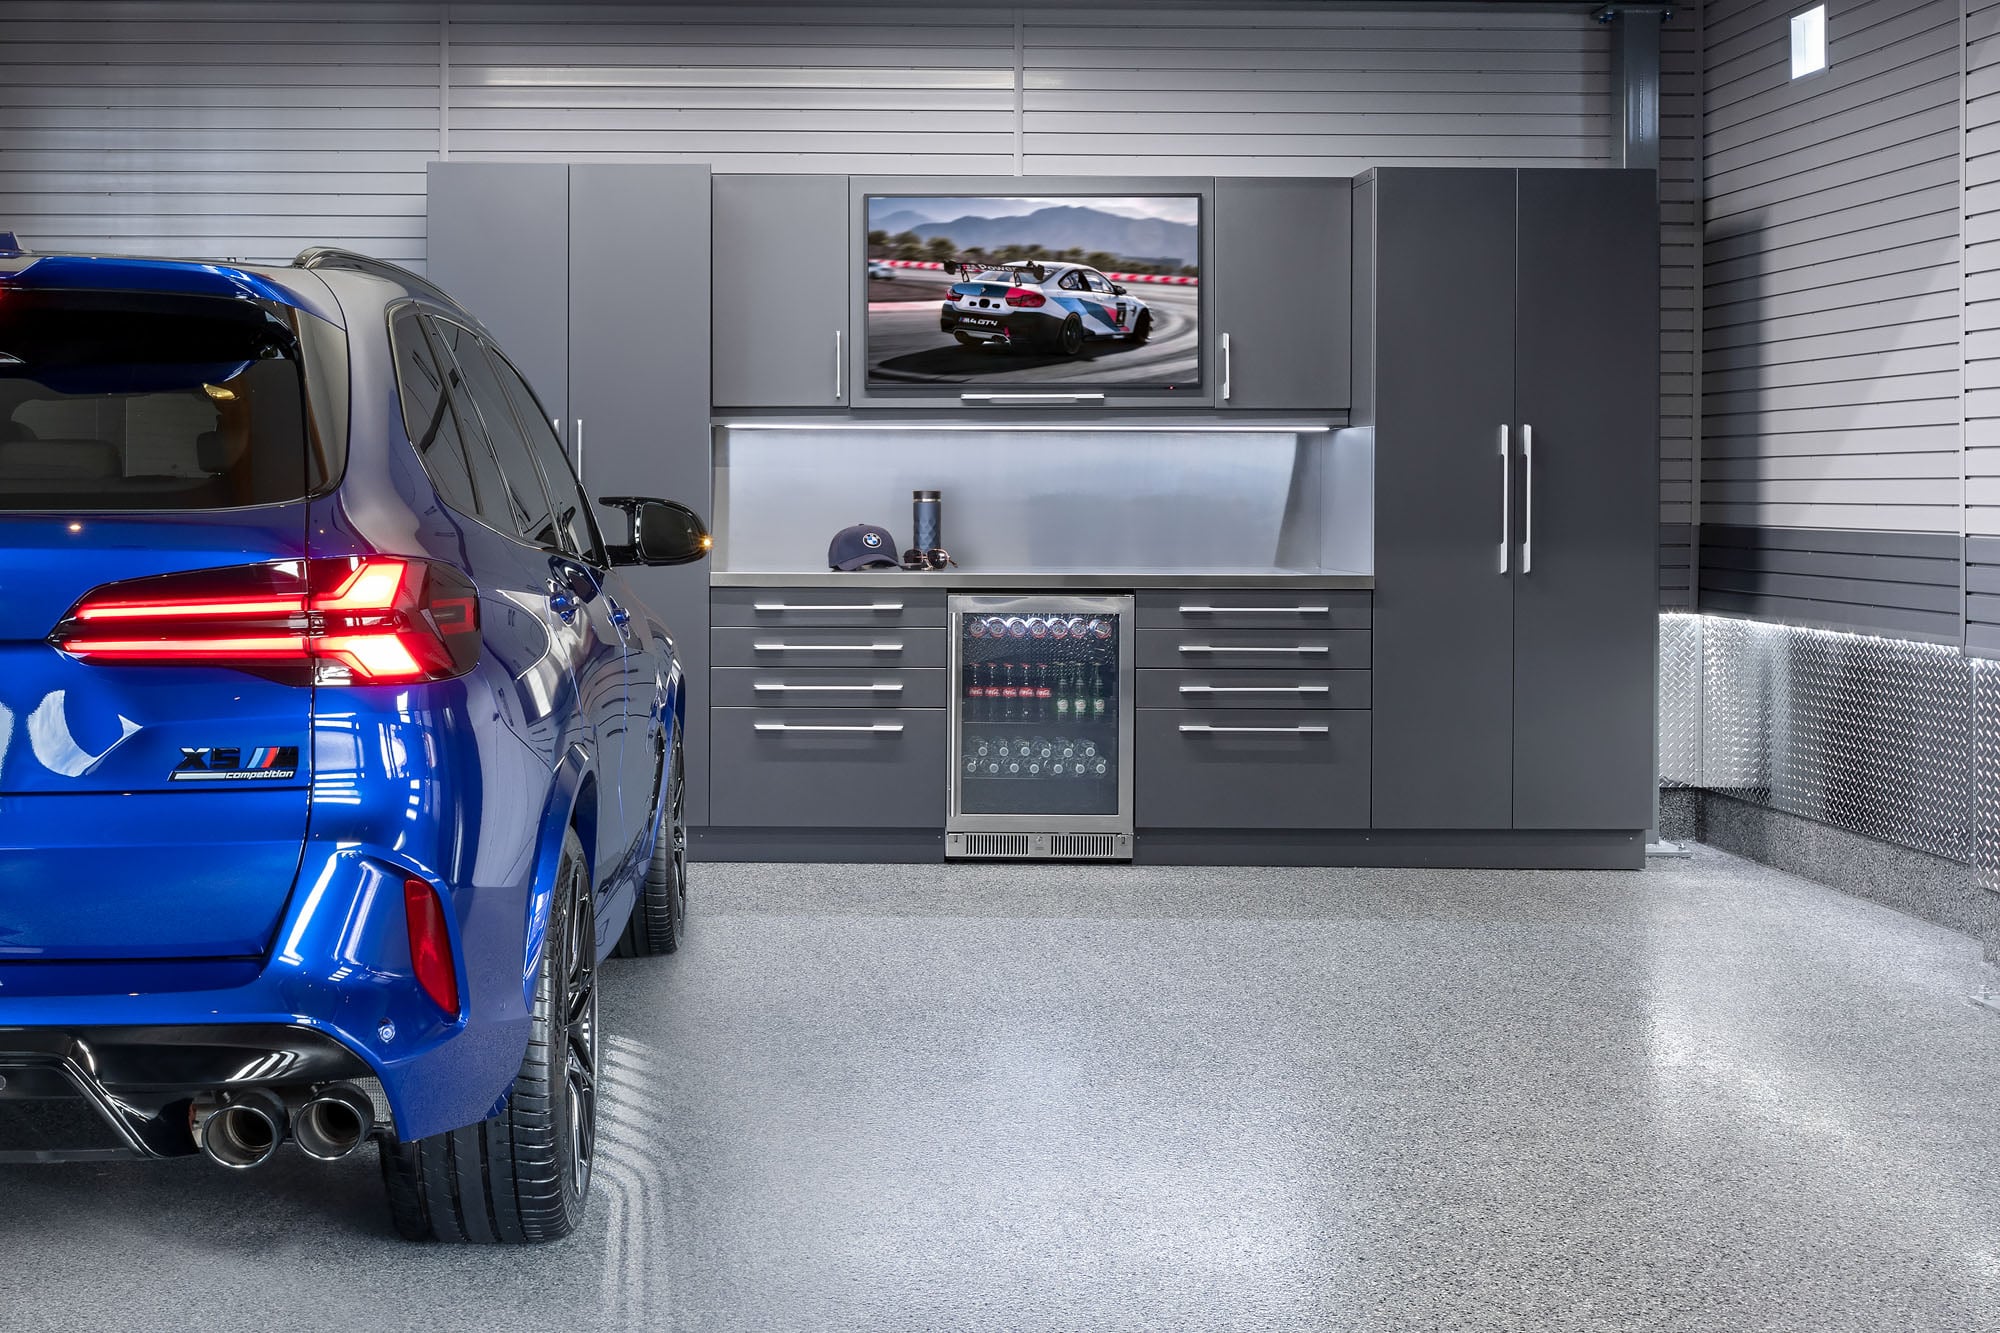
How floor coatings interact with cabinet systems
Your floor coating and cabinet system must work together. Installation sequence, load distribution, and anchoring methods all affect long-term performance.
Installation sequence considerations
Floor coatings should be applied before cabinet installation. This ensures complete coverage under and around cabinet bases, eliminating potential moisture entry points and creating a continuous, sealed surface.
However, cabinets cannot be installed until the coating reaches full cure. Placing heavy loads on a partially cured coating creates permanent indentations and can compromise adhesion.
Point load distribution
Steel garage cabinets concentrate significant weight on small contact points—typically leg pads or toe kicks. A fully loaded cabinet system can place hundreds of pounds per square inch on these contact points.
Quality coatings distribute this stress across the substrate without cracking or delaminating. Thinner coatings may show compression marks or develop stress fractures around cabinet feet over time.
Anchoring through coated surfaces
Wall-mounted cabinets and slatwall systems require anchoring into wall studs or blocking. If your coating extends up the wall or onto a foundation wall, you'll need to drill through the coating for anchors.
This is normal and does not compromise the floor coating's integrity when done properly. The anchor points seal against the coating, preventing moisture infiltration.
Integrating slatwall systems with your floor coating
Slatwall panels create versatile wall storage that keeps gear off the floor. Proper integration with your floor coating maximizes both functionality and aesthetics.
Why slatwall reduces floor stress
Every tool, bike, or piece of equipment hanging on slatwall is one less item sitting on your floor. This reduces point loads on the coating and keeps traffic paths clear for vehicles and foot traffic.
Garage Living's slatwall systems include hooks, baskets, shelves, and specialty holders that accommodate everything from garden tools to sports equipment. This versatility means you can organize your entire garage vertically.
Baseboard and transition details
The junction between floor coating and slatwall creates a potential weak point if not detailed properly. Many professional installations include an aluminum diamond plate baseboard that covers this transition and protects the lower edge of the slatwall from kicks and bumps.
This baseboard also makes cleaning easier. Dust and debris collect at wall-floor junctions, and a smooth metal baseboard wipes clean faster than textured slatwall material.
Weight limits and wall preparation
Slatwall weight capacity depends on wall construction and anchoring methods. Standard drywall over studs handles moderate loads when anchored into every stud. Heavy items like large ladders or multiple bikes may require additional blocking.
Your design consultant should assess wall construction during the planning phase and recommend appropriate mounting solutions for your intended storage loads.
Overhead storage racks and floor coating requirements
Ceiling-mounted overhead racks store seasonal items, luggage, and bulky gear above your vehicles. These systems don't directly touch your floor coating but still influence your renovation planning.
Clearance and vehicle considerations
Floor coating thickness adds approximately 1/8 to 1/4 inch to your floor height. If you're planning overhead racks, account for this change when calculating clearance for vehicles and garage door operation.
This small height change rarely causes problems, but it's worth measuring before finalizing rack placement—especially if you drive a tall truck or SUV.
Post-mounted vs. ceiling-mounted systems
Some overhead storage systems use floor-to-ceiling posts rather than ceiling-only mounting. These posts create direct point loads on your floor coating similar to cabinet legs.
Ensure your coating has reached full cure before installing post-mounted systems. The post bases should sit flat on the coating without wobbling, which could indicate surface irregularities that need attention.
How car lifts affect floor coating selection
Four-post car lifts let you double your parking capacity or create workspace beneath a stored vehicle. These systems place significant demands on your floor coating.
Load concentration at lift posts
A four-post lift supporting a 4,000-pound vehicle concentrates that weight (plus the lift's own weight) across four relatively small post pads. Each pad may experience loads exceeding 1,500 pounds.
Your floor coating must handle this concentrated pressure without cracking, delaminating, or compressing permanently. Polyaspartic coatings with proper thickness and substrate preparation typically handle these loads well.
Approach ramp considerations
Most car lifts include steel approach ramps. These ramps sit directly on your floor coating and experience repeated stress from vehicles driving on and off. The coating at ramp contact points sees more wear than other areas.
Drip tray placement
Quality car lifts include drip trays to catch oil and fluids from the vehicle above. These trays protect your floor coating from chemical exposure. However, they must be cleaned regularly to prevent overflow.
Decorative finish options for garage floor coatings
Your floor coating can be functional and attractive. Understanding decorative options helps you create a garage that complements your home's aesthetic.
Flake color blends
Decorative flakes come in numerous color combinations. Popular options range from neutral gray and tan blends to bold combinations featuring blue, red, or metallic accents. Your choice should complement your cabinet color and overall design theme.
Larger flakes create a more dramatic visual effect but may show tire marks more readily. Smaller flakes provide a more subtle, uniform appearance that hides marks better.
Read: Behind the flakes: What’s in your garage floor coating?
Solid color and metallic finishes
Some homeowners prefer solid-color finishes without decorative flakes. These create a sleek, modern look but show every mark and imperfection. They require more frequent cleaning to maintain appearance.
Metallic epoxy and polyaspartic systems create swirled, marbled effects that mimic polished concrete or natural stone. These finishes are striking but require experienced installers to achieve consistent results.
Gloss levels and texture
High-gloss finishes reflect light and make garages appear brighter and larger. However, they also show scratches and tire marks more prominently than satin or matte finishes.
Current design trends favor matte and satin polyaspartic finishes that diffuse light rather than reflecting it directly. These finishes hide micro-scratches better and maintain their appearance longer between cleanings.
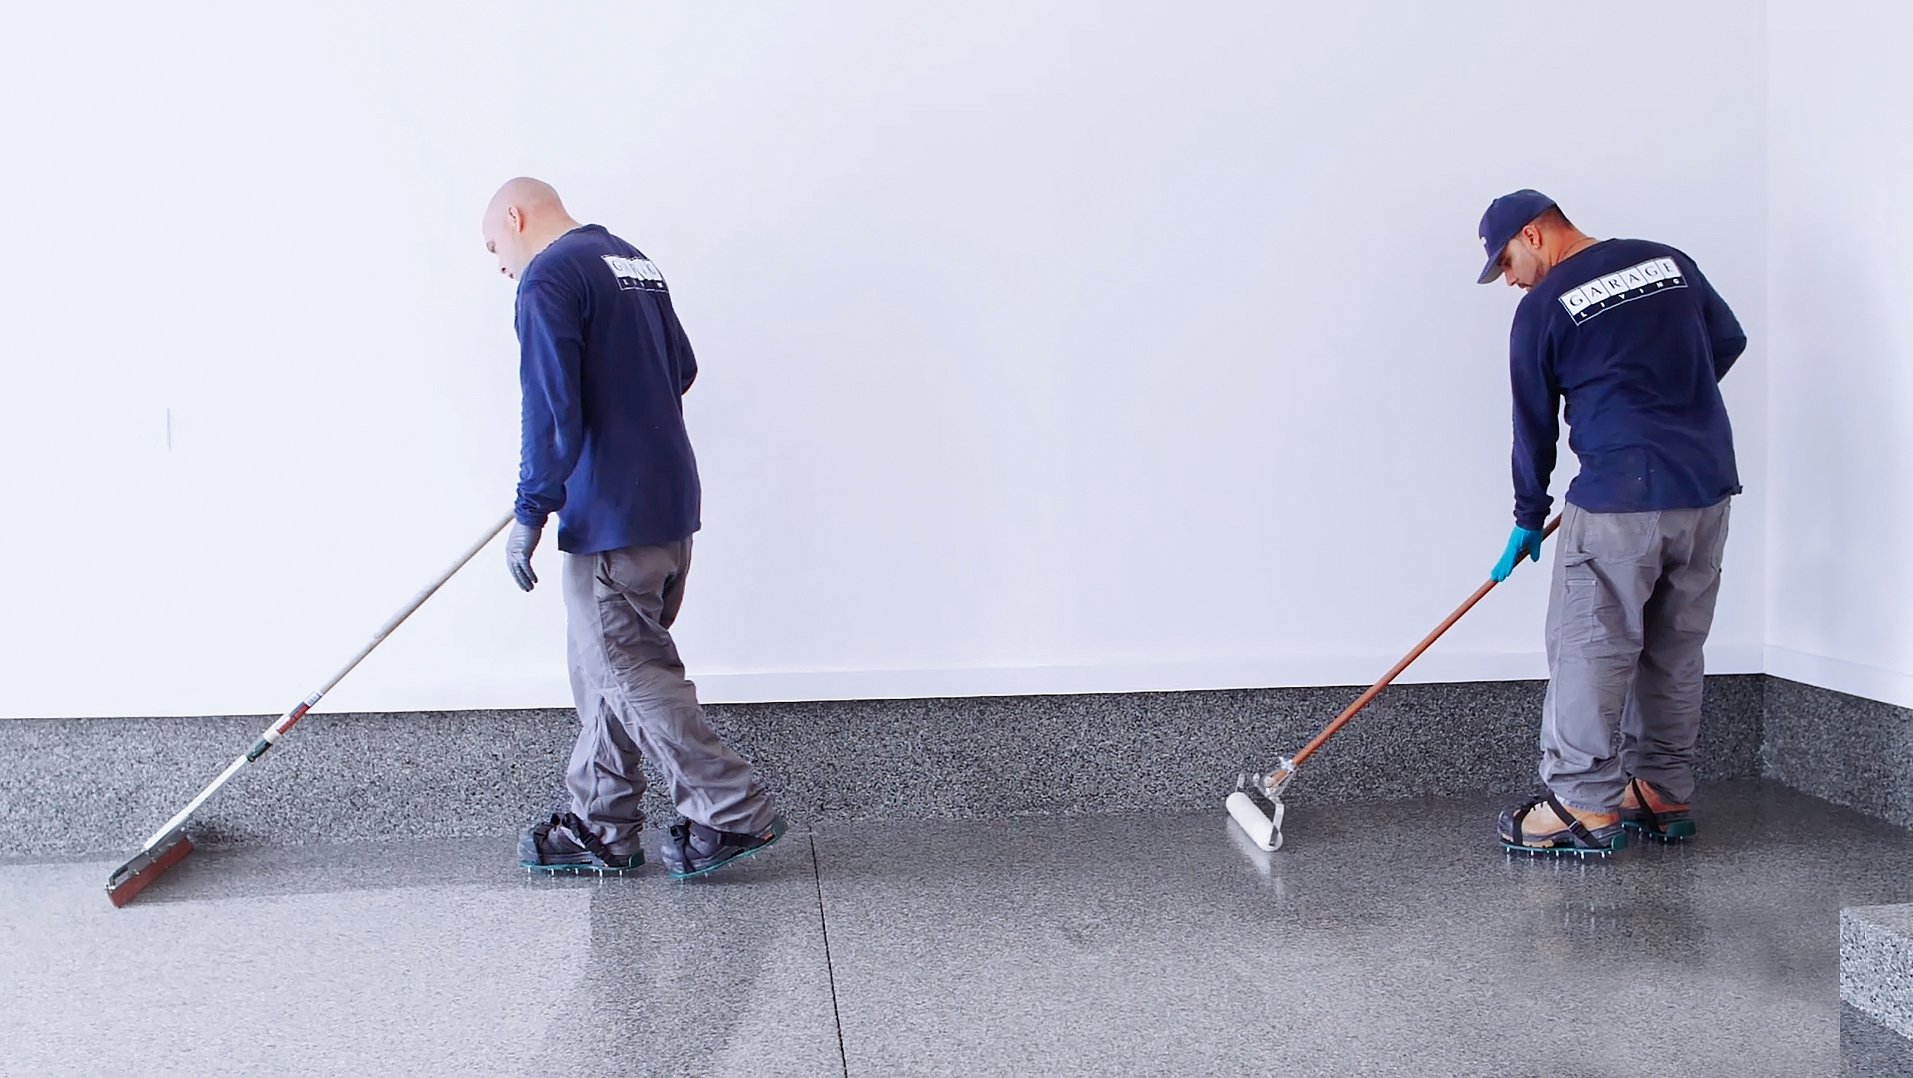
The complete floor coating application process
Understanding the application process helps you prepare your garage and set realistic expectations for project timeline and results.
Pre-installation preparation
Remove all items from your garage before the installation crew arrives. This includes vehicles, stored items, and anything mounted on walls or ceilings that could obstruct work.
The installation area should be accessible from your driveway. Crews need to move heavy grinding equipment and material containers in and out throughout the day.
Day-of-installation timeline
Professional crews typically arrive in the morning and complete single-car garages in one day. Larger garages may require two days. The process follows a specific sequence: grinding, crack repair, base coat, flake broadcast, and top coat.
Each layer needs appropriate cure time before the next step. Temperature and humidity affect cure rates, so experienced installers adjust their timeline based on conditions.
Post-installation cure period
Your garage door must remain open several inches for 12-24 hours after coating to allow proper ventilation. Light items can return after 24-48 hours. Vehicles typically wait 4-7 days, and heavy storage systems should wait until full cure is achieved.
Your installer will specify exact timelines based on the products used and ambient conditions during application.

Maintenance requirements for coated garage floors
Proper maintenance extends your coating's lifespan and keeps your garage looking its best. The good news: polyaspartic coatings are remarkably easy to maintain.
Regular cleaning procedures
Dust mopping or sweeping removes loose dirt and debris that could scratch the surface under foot traffic. Weekly sweeping keeps most garages clean. High-traffic garages may need more frequent attention.
Occasional wet mopping with a mild detergent handles stuck-on dirt and road grime. Avoid harsh chemicals and abrasive cleaners that could damage the top coat's finish.
Addressing spills and stains
Wipe up oil, gasoline, and chemical spills promptly. While polyaspartic coatings resist these substances, prolonged exposure can affect the finish. A paper towel or shop rag handles most spills effectively.
Salt and road brine from winter driving should be rinsed away regularly. These substances don't damage the coating but can leave white residue if allowed to dry repeatedly.
Long-term maintenance considerations
Quality polyaspartic coatings maintain their appearance for many years with basic care. Eventually, high-traffic areas may show wear patterns. A fresh top coat can restore the finish without requiring complete reapplication.
Warranty coverage for heavy-use garage floors
Understanding warranty terms helps you evaluate different coating options and installation providers. Not all warranties offer equal protection.
What warranties typically cover
Most professional floor coating warranties cover peeling, delamination, and adhesion failure under normal use. They typically exclude damage from abuse, improper maintenance, or chemical exposure beyond specified limits.
Garage Living offers a 21-year limited warranty on Floortex® floor coating installations. This warranty reflects confidence in both the product formulation and the company's installation standards.
Factors that can void coverage
Modifying the coating (cutting, drilling without proper sealing), using harsh chemicals, or failing to address moisture issues can void warranty coverage. Read your specific warranty terms carefully.
Questions to ask before installation
Ask potential installers: What specifically does your warranty cover? What voids it? How do I file a claim? Who performs warranty repairs? Reputable companies answer these questions clearly and put warranty terms in writing.
Planning your complete garage renovation
Floor coating is one component of a larger renovation project. Planning all elements together ensures better results and a more efficient process.
Design consultation benefits
Professional design consultations help you visualize your finished garage before work begins. Garage Living offers complimentary design consultations that include CAD visualizations showing your specific space with proposed flooring, cabinets, and storage systems.
This planning phase identifies potential issues before they become expensive problems. It also ensures all components—flooring, cabinets, slatwall, and overhead storage—work together aesthetically and functionally.
Budget considerations
Quality garage renovations represent a significant investment. Costs vary based on garage size, product selections, and local labor rates. Request detailed quotes that itemize materials and labor so you can compare options accurately.
Consider the long-term value rather than just upfront cost. A properly installed polyaspartic coating with professional storage systems lasts decades. Cheap alternatives often require replacement within a few years.
Timeline expectations
Complete garage renovations typically take one to three days for installation, plus cure time before full use. Larger projects with custom cabinetry may require additional time.
Common mistakes to avoid with garage floor coatings
Learning from others' mistakes helps you achieve better results. These issues appear frequently in failed garage floor projects.
Inadequate surface preparation
The most common failure cause is insufficient surface preparation. Skipping diamond grinding, inadequate cleaning, or ignoring moisture issues virtually guarantees coating failure within a year or two.
Choosing coating based on price alone
DIY kits and low-cost installers often use inferior products that cannot handle garage conditions. The initial savings evaporate when you need to recoat within a few years—or worse, strip and start over.
Ignoring cure time requirements
Placing vehicles or heavy items on partially cured coatings causes permanent damage. Follow your installer's timeline exactly, even if the floor appears dry to the touch.
Not planning for future storage
Installing flooring without considering future cabinet or storage additions limits your options. Planning the complete system upfront—even if you install in phases—ensures everything works together.
How Garage Living approaches integrated garage systems
Garage Living delivers complete garage makeovers that combine flooring, cabinetry, and storage into one cohesive system. This integrated approach offers advantages over piecing together components from multiple vendors.
Single-source accountability
When one company handles your entire project, accountability is clear. If something goes wrong, you have one point of contact rather than multiple vendors pointing fingers at each other.
Coordinated design and installation
Garage Living's design process considers how flooring, cabinets, slatwall, and overhead storage interact. The installation sequence ensures each component performs optimally without compromising others.
Showroom experience
Visiting a showroom lets you see and touch products before committing. You can evaluate cabinet construction quality, feel coating texture, and visualize color combinations in person rather than relying solely on photos and samples.
Selecting garage floor coatings for heavy storage systems
Selecting the right floor coating for a garage with heavy storage systems requires understanding coating chemistry, surface preparation requirements, and how flooring interacts with cabinets, slatwall, and overhead racks.
Polyaspartic coatings offer superior performance compared to traditional epoxy for most garage applications. Their flexibility, UV stability, fast cure time, and chemical resistance make them ideal for high-demand environments.
Professional surface preparation—specifically diamond grinding—creates the mechanical bond necessary for long-term coating adhesion under heavy loads. This step cannot be shortcut without compromising results.
Planning your floor coating as part of an integrated garage system ensures all components work together. Design consultations help you visualize results and avoid costly mistakes before installation begins.
FAQs about garage floor coatings for heavy storage
How long should I wait after floor coating to install cabinets?
Wait four to seven days after coating application before installing heavy cabinets. Garage Living's Floortex® system allows light foot traffic within 24 hours, but full cure for heavy loads requires additional time.
Your installer will specify exact timing based on products used and ambient conditions during application.
Can I drive on my coated floor immediately after installation?
No. Most polyaspartic coatings require 24-48 hours before vehicle traffic. Full cure for heavy loads takes four to seven days. Driving on partially cured coating causes permanent damage.
Follow your installer's specific timeline, which may vary based on temperature and humidity during application.
Will floor coating crack under heavy cabinet loads?
Quality polyaspartic coatings with proper thickness and substrate preparation handle heavy cabinet loads without cracking. Garage Living uses industrial-grade Floortex® coatings engineered for garage conditions including point loads from storage systems.
Thin DIY coatings may compress or crack under concentrated weight, which is one reason professional application matters.
How does hot tire pickup affect coated floors?
Hot tire pickup occurs when heated tires soften floor coating and pull it off the concrete when cooling. This primarily affects epoxy coatings. Polyaspartic coatings have higher heat tolerance and resist this failure mode.
Garage Living's Floortex® specifically resists hot tire pickup, protecting your floor from one of the most common coating failure causes.
Can I apply coating over an existing epoxy floor?
Applying new coating over existing epoxy requires proper surface preparation. The old coating must be mechanically abraded to create adhesion for the new layer. If the existing epoxy is failing, it typically needs removal.
Professional installers assess existing conditions and recommend appropriate preparation methods.
What happens if I spill oil on my coated floor?
Polyaspartic coatings resist oil penetration. Wipe up spills promptly with a paper towel or shop rag. While brief exposure won't damage the coating, prolonged contact with some chemicals may affect the finish over time.
Garage Living's Floortex® coating resists motor oil, gasoline, brake fluid, and common household chemicals.
How do I clean a polyaspartic garage floor?
Regular dust mopping removes loose debris. Periodic wet mopping with mild detergent handles stuck-on dirt. Avoid harsh chemicals and abrasive cleaners that could damage the top coat finish.
Salt residue from winter driving should be rinsed away regularly to prevent buildup.
Does floor coating work in cold climates?
Yes! Polyaspartic coatings perform well in cold climates because they maintain flexibility as temperatures drop. This flexibility prevents cracking when concrete contracts during winter freeze cycles.
Application should occur when temperatures permit proper cure—typically above 40°F. Professional installers schedule projects appropriately for local climate conditions.